前两篇文章介绍了插件设置页面的编写和osc open api的授权相关内容,这节我们将实现把文章同步到osc博客上。我们先看文档关于这个api的描述 :http://www.oschina.net/openapi/docs/blog_pub
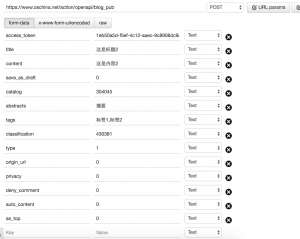
测试restful api时,我推荐安装chrome的postman扩展。从设置页复制access token,其他参数按照文档的说法填写,如图:
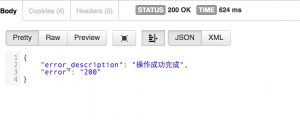
成功后返回的数据:
不得不吐槽一下,oschina博客相关 api很简陋,CURD只实现了Create的和Read部分,没有Delete,没有Update, 而且接口返回内容也不太对劲,讲道理的话,本应返回个成功后的blog文章id或者url吧,方便将wp的文章id跟oschina的文章id进行对应,并且需要 id 才可以使用文章详情的api吧,只给个“操作成功完成” 也太草草事了吧。希望oschina之后能改进。
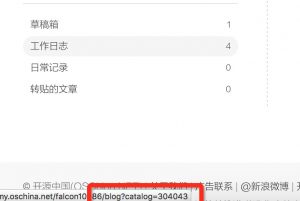
还有一点,文档没有详细说明部分参数的作用和取值,比如catalog,实际上取值博客主页里的”工作日志”,”日常记录”和”转帖文章”的数字id,把鼠标放上去可以看到url上的数字。
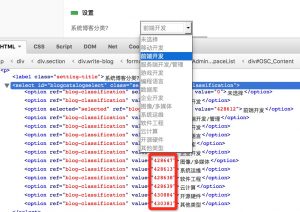
还有一个是classification,就是分类的id,可以在文章编辑器下的分类中查看,取值是option的value.
好了,接下来开始写 wordpress 插件的部分,这里需要用到 publish_post action。
向__construct方法加入一个新的钩子。
add_action('publish_post', array($this,'publish_post'),10,2);
第三个参数10表示执行的优先级,在wordpress里一个钩子可以挂靠多个回调函数,这个参数数值越大,执行的回调方法的顺序越靠后,10是默认值。
最后一个参数表示回调函数接收几个参数,publish_post action 接收文章两个参数,id和$post对象,所以填2。
现在我们加入两个方法。
// 发布文章时同步到osc
public function publish_post($ID,$post) {

    //$permalink = get_permalink( $ID ); 固定链接


    $post_arr = array();
    $tags = "";
    $post_arr['title'] = $post->post_title;
    $post_arr['content'] = $post->post_content;
    $tags_arr = wp_get_post_tags($ID);
    if(!empty($tags_arr)){
        foreach($tags_arr as $tag) {
            $tags .= $tag->name .',';
        }
        $tags = rtrim($tags,',');
    }
    $post_arr['tags'] = $tags;
    $response = $this->_blog_pub($post_arr);
    if(is_wp_error()){
        var_dump($response);
        exit;
    }


}

// open api发布博客
protected function _blog_pub($args = array()){
    /**
     * access_token    true   string     oauth2_token获取的access_token
    title  true   string     博客标题
    content    true   string     博客内容
    save_as_draft  false  int    保存到草稿 是:1 否:0  0
    catalog    false  string     博客分类, 工作日志:304043,日常记录:304044,转帖的文章:304045
    abstracts  false  string     博客摘要
    tags   false  string     博客标签,用逗号隔开
    classification     true   int    系统博客分类     0
    428602>移动开发
    428612>前端开发
    428640>服务端开发/管理
    429511>游戏开发
    428609>编程语言
    428610>数据库
    428611>企业开发
    428647>图像/多媒体
    428613>系统运维
    428638>软件工程
    428639>云计算
    430884>开源硬件
    430381>其他类型
    type   false  int    原创:1、转载:4  1
    origin_url     false  string     转载的原文链接
    privacy    false  string     公开:0、私有:1  0
    deny_comment   false  string     允许评论:0、禁止评论:1  0
    auto_content   false  string     自动生成目录:0、不自动生成目录:1     0
    as_top     false  string     非置顶:0、置顶:1     0
     */

    $defaults = array(
        'title' => "",
        "content" => "",
        "save_as_draft" => 0,
        "catalog" => 304043,//工作日志:304043,日常记录:304044,转帖的文章:304045
        "abstracts" => "",
        "tags" => "",
        "classification" => 430381,
        "type" => 1,
        "origin_url" => "",
        "privacy" => 0,
        "deny_comment" => 1,
        "auto_content" => 0,
        "as_top" => 0,
        "access_token" => $this->_get_access_token()
    );

    $args = wp_parse_args($args, $defaults);
    $url = $this->api_site . '/action/openapi/blog_pub';
    $response = wp_remote_post($url, array('body' => $args,'sslverify'=>true));
    return $response;

}
好了,我们测试一下,在wordpress新建一篇文章,随便写点内容,点击发布。这时我们再打开osc的个人主页,文章已经同步过来了。
文章同步成功了,接下来我们来自定义同步的一些选项吧,比如同步时选择分类,置顶,是否转帖等。
增加一个meta box,就是类似文章编辑页下面和旁边的区块,里面有一些可以设置的内容,比如标签:
首先在构造器上加入一个action,
add_action( 'add_meta_boxes', array($this,'add_meta_boxes') );
然后新加入两个方法:
public function add_meta_boxes(){
    //加入一个metabox
    add_meta_box( "oscpress_meta_box", '<strong>OSCPress文章同步</strong>', array($this,'meta_box_callback')) ;
}

// 显示在metabox的内容
public function meta_box_callback(){
    echo "hello, meta box";
}
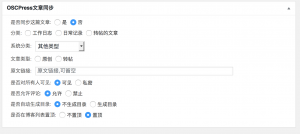
完成后刷新文章编辑页,可以看到metabox出现在编辑器下方了。
把选项的html加到meta_box_callback里去:
    // 显示在metabox的内容
    public function meta_box_callback(){
?>
        <div class="oscpress_options">
            <strong>是否同步这篇文章:</strong>
            <label><input type="radio" name="oscpress_syn_enable" value="1" />是</label>
            <label><input type="radio" name="oscpress_syn_enable" value="0" checked/>否</label>
        </div>
        <div class="oscpress_options">
            <strong>分类:</strong>
            <label><input type="radio" name="oscpress_syn[catalog]" value="304043" checked/>工作日志</label>
            <label><input type="radio" name="oscpress_syn[catalog]" value="304044" />日常记录</label>
            <label><input type="radio" name="oscpress_syn[catalog]" value="304044" />转帖的文章</label>
        </div>

        <div class="oscpress_options">
            <strong>系统分类:</strong>
            <select class="select_box" name="oscpress_syn[classification]" id="blogcatalogselect">
                <option value="428602" ref="blog-classification">移动开发</option>
                <option value="428612" ref="blog-classification">前端开发</option>
                <option value="428640" ref="blog-classification">服务端开发/管理</option>
                <option value="429511" ref="blog-classification">游戏开发</option>
                <option value="428609" ref="blog-classification">编程语言</option>
                <option value="428610" ref="blog-classification">数据库</option>
                <option value="428611" ref="blog-classification">企业开发</option>
                <option value="428647" ref="blog-classification">图像/多媒体</option>
                <option value="428613" ref="blog-classification">系统运维</option>
                <option value="428638" ref="blog-classification">软件工程</option>
                <option value="428639" ref="blog-classification">云计算</option>
                <option value="430884" ref="blog-classification">开源硬件</option>
                <option value="430381" ref="blog-classification" selected>其他类型</option>
            </select>
        </div>
        <div class="oscpress_options">
            <strong>文章类型:</strong>
            <label><input type="radio" name="oscpress_syn[type]" value="0">原创</label>
            <label><input type="radio" name="oscpress_syn[type]" value="1">转帖</label>
        </div>
        <div class="oscpress_options">
            <strong>原文链接:</strong>
            <label><input type="text" size=80 name="oscpress_syn[origin_url]" value="" placeholder="原文链接,可留空"></label>

        </div>
        <div class="oscpress_options">
            <strong>是否对所有人可见:</strong>
            <label><input type="radio" name="oscpress_syn[privacy]" value="0" checked>可见</label>
            <label><input type="radio" name="oscpress_syn[privacy]" value="1" >私密</label>
        </div>
        <div class="oscpress_options">
            <strong>是否允许评论:</strong>
            <label><input type="radio" name="oscpress_syn[deny_comment]" value="0" checked>允许</label>
            <label><input type="radio" name="oscpress_syn[deny_comment]" value="1" >禁止</label>
        </div>
        <div class="oscpress_options">
            <strong>是否自动生成目录:</strong>
            <label><input type="radio" name="oscpress_syn[auto_content]" value="0" checked>不生成目录</label>
            <label><input type="radio" name="oscpress_syn[auto_content]" value="1" >生成目录</label>
        </div>
        <div class="oscpress_options">
            <strong>是否在博客列表置顶:</strong>
            <label><input type="radio" name="oscpress_syn[as_top]" value="0" checked>不置顶</label>
            <label><input type="radio" name="oscpress_syn[as_top]" value="1" >置顶</label>
        </div>

        <?php
    }
效果如图:
我们修改一下样式:
    // 显示在metabox的内容
    public function meta_box_callback(){

?>
        <style>
            .oscpress_options{
                margin: 10px;
            }
            .oscpress_options strong,.oscpress_options label,.oscpress_options select{
                display: inline-block;
                margin-right: 5px;
            }
            .oscpress_options strong {
                font-weight: 200;
            }
        </style>
        <div class="oscpress_options">
            <strong>是否同步这篇文章:</strong>
            <label><input type="radio" name="oscpress_syn_enable" value="1" />是</label>
            <label><input type="radio" name="oscpress_syn_enable" value="0" checked/>否</label>
        </div>
....
这样感觉好多了。
好了,我们需要修改一下public_post方法,在同步文章时才能应用这些选项。
// 发布文章时同步到osc
public function publish_post($ID,$post) {

    //$permalink = get_permalink( $ID ); 固定链接

    if( isset($_POST['oscpress_syn_enable']) && $_POST['oscpress_syn_enable'] == 0){
        return ; // 不同步到osc博客
    }


    $post_arr = array();
    $tags = "";
    $post_arr['title'] = $post->post_title;
    $post_arr['content'] = $post->post_content;
    $post_arr['abstracts'] = get_the_excerpt($ID);
    $tags_arr = wp_get_post_tags($ID);
    if(!empty($tags_arr)){
        foreach($tags_arr as $tag) {
            $tags .= $tag->name .',';
        }
        $tags = rtrim($tags,',');
    }
    $post_arr['tags'] = $tags;
    $post_arr = array_merge($post_arr,$_POST['oscpress_syn']);
    $response = $this->_blog_pub($post_arr);


}
同步成功后发送到动弹:
继续修改publish_post方法,发送动弹,并将同步时用户选项写入post_meta。:
// 发布文章时同步到osc
public function publish_post($ID,$post) {


    if( isset($_POST['oscpress_syn_enable']) && $_POST['oscpress_syn_enable'] == 0){
        return ; // 不同步到osc博客
    }

    $post_arr = array();
    $tags = "";
    $post_arr['title'] = $post->post_title;
    $post_arr['content'] = $post->post_content;
    $post_arr['abstracts'] = get_the_excerpt($ID);
    $tags_arr = wp_get_post_tags($ID);
    if(!empty($tags_arr)){
        foreach($tags_arr as $tag) {
            $tags .= $tag->name .',';
        }
        $tags = rtrim($tags,',');
    }
    $post_arr['tags'] = $tags;
    $post_arr = array_merge($post_arr,$_POST['oscpress_syn']);
    unset($post_arr['tweet_enable']);
    $response = $this->_blog_pub($post_arr);
    if(!is_wp_error($response) ){

        if($_POST['oscpress_syn']['tweet_enable']) {
            $post_link = apply_filters('oscpress_sync_link',wp_get_shortlink($ID),$ID); // 发布到osc动弹的文章链接

            $tweet_template ="发布了一篇文章:<<%%post_title%%>>, 链接:%%post_link%%, 自豪地使用 OscPress";
            $tweet_content = str_replace(
                array('%%post_title%%','%%post_link%%'),
                array($post_arr['title'],$post_link),
                $tweet_template
            );
            $response2  = $this->_send_tweet($tweet_content);
        }
        $oscpress_syn = $_POST['oscpress_syn'];
        $oscpress_syn['timestamp'] = current_time('timestamp');
        update_post_meta($ID,'_oscpress_syn',$oscpress_syn);


    }else{
        //var_dump($response);
        //exit;
    }


}
增加发送动弹和获取文章同步选项方法:
//  发布一条动弹
protected function _send_tweet($content,$img_path = null)
{
    $url = $this->api_site . '/action/openapi/tweet_pub';

    $args = array(
        'access_token' => $this->_get_access_token(),
        'msg' => $content,
    );
    return  wp_remote_post($url, array('body' => $args));
}
// 获取指定文章同步选项
protected function _get_syn_data( $post_id = null ) {
    $post = get_post($post_id);
    return get_post_meta($post->ID,"_oscpress_syn",true);
}
post meta box增加一个发布动弹的可选项:
    // 显示在metabox的内容
    public function meta_box_callback(){


?>
        <style>
            .oscpress_options{
                margin: 10px;
            }
            .oscpress_options strong,.oscpress_options label,.oscpress_options select{
                display: inline-block;
                margin-right: 5px;
            }
            .oscpress_options strong {
                font-weight: 200;
            }
        </style>

        <div class="oscpress_options">
            <strong>是否同步这篇文章:</strong>
            <label><input type="radio" name="oscpress_syn_enable" value="1" checked />是</label>
            <label><input type="radio" name="oscpress_syn_enable" value="0" />否</label>
        </div>
        <div class="oscpress_options">
            <strong>是否同步后发动弹:</strong>
            <label><input type="radio" name="oscpress_syn[tweet_enable]" value="1" checked />是</label>
            <label><input type="radio" name="oscpress_syn[tweet_enable]" value="0" />否</label>
        </div>
...
最后修改meta box的标题,把同步信息显示出来。
public function add_meta_boxes(){
    //加入一个metabox
    $sync_data = $this->_get_syn_data();
    $sync_info = "";
    if($sync_data){
        $sync_info = sprintf("<span style='font-weight: normal;'> ( 上次同步于: %s ) </span>" , date_i18n('Y-m-d H:i:s',$sync_data['timestamp']));
    }
    add_meta_box( "oscpress_meta_box", '<strong>OSCPress文章同步</strong>'.$sync_info, array($this,'meta_box_callback')) ;
}
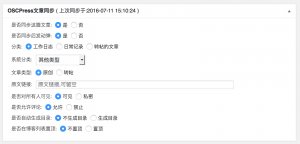
完成后再更新文章,可以看到同步的消息已经显示出来了。
好了,现在基本功能已经完成,下一节我们将补充一些其他内容。增加更多设置项和代码优化。
